
An ultrasonic cleaner is a device that works by developing a cavitation process using ultrasonic technology.
If the cavitation mechanism is not efficient, your machine may not clean the dirt and debris from the surface of items so well. And if it does not work as expected, owning such a machine is useless.
You may, therefore, require testing your ultrasonic cleaner machine at times when you feel that it’s not working properly or as efficiently as it should be.
Testing an Ultrasonic Cleaner
While there’s an easy way to check whether your ultrasonic cleaner is working or not, testing for the machine’s efficiency may be somewhat complex.
This is due to the fact that its efficiency may depend on various factors like the power of transducers, the chemistry of fluid you use, fluid temperature, water quality you use, etc.
This means you may need to perform some additional steps when you want to test the performance of your ultrasonic cleaner device.
The testing of your unit can be done via two methods.
- For working: By simply observing the activity in the tank
- For working and efficiency: By performing the foil test using a thin aluminum foil
How to Tell if Ultrasonic Cleaner is Working?
This is generally a test you should perform with an industrial device you have recently purchased.
To test the working of your ultrasonic cleaning device follow these steps…
- Fill in the ultrasonic cleaner tank with water and a cleaning solution.
- Switch the unit on and observe the activity in the tank for 2-3 minutes to know whether your ultrasonic cleaning machine is working or not.
- If it’s working, you can observe activities such as ripple effect and agitation on the solution’s surface.
- Also, you may hear a fizzing sound or a high-pitched humming inside the liquid.
The sound and ripple effects are due to the small tiny bubbles that are developed in the fluid due to the ultrasonic cavitation action.
If there’s no action or sound experienced, check whether you have installed the device properly. Also, check for the cord and power supply to make sure that the machine is being powered properly.
If all seems to be OK most probably, there is some problem with your machine due to which it is not working. These problems might be due to the issues with the transducer or frequency generator, or any loose internal components.
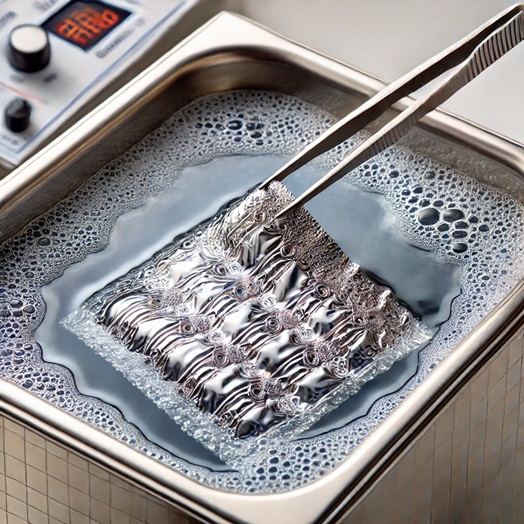
How to Perform a Foil Test for Ultrasonic Cleaner?
If you own a machine that’s working great for a long period of time and has only shown signs of ineffectiveness recently (i.e. the parts you are cleaning are no longer coming out clean) – you may then need to perform a popular ultrasonic test which is known as “foil test”.
To perform this test, all you need is:
- A thin domestic aluminum foil (of about 10-25 μm thickness) and
- A wireframe that can easily fit inside your ultrasonic cleaner tank to hold the foil
- You can use durable tape or a tweezer, to hold the foil in a machine, if the wireframe is not available.
Steps you need to follow
To start with the ultrasonic foil test, fill 2/3 of your ultrasonic cleaner tank with water mixed with concentrate solution. Mix the solution and degas it for about 10 minutes.
After preparing the unit, follow these steps:
- Use a wireframe or tape to partially submerge the aluminum foil into the ultrasonic solution
- Turn on the unit without using the heat option and set the timer for 1 minute
- Wait until the machine gets automatically switched off after running for 1 minute
- Now gently remove the foil from the ultrasonic cleaner and allow it to dry naturally
- When the foil has been dried out, it is time to inspect the aluminum foil sheet.
Evaluating the results of the foil test
If your ultrasonic cleaner is working fine, the part of aluminum foil that is submerged inside the water solution should be perforated (holes and crinkles) and the part of the sheet that is above the water should not be perforated uniformly.
If the foil is not punctured or the perforations are uneven, it’s simply a sign of low performance which means your machine is not working as efficiently as it should be. This can be sometimes due to faulty transducers so you should check and replace the transducers if needed.
Is it important to use a concentrated solution?
While using an appropriate fluid quantity is recommended, you may also consider using plain distilled water (without the concentrate) for performing the test.
The concentrate is only used to test how powerfully your machine is operating due to which, there may be slight differences seen in the perforated aluminum foil. This means foil that has been tested with a solution in the water may show a bit more perforation than the foil that has been tested with plain water.
How often should you perform ultrasonic foil tests?
As such, there is no particular time frame after which you need to perform the ultrasonic test. But if you wish to measure the performance of your cleaner or want to judge how effective it has been working, you can do this periodic test once a month or two.
Or, in case you do not want to do periodic tests, make sure that you perform the test at least when you see an overall reduction in the performance of your cleaning system or when you feel that your unit is not cleaning the items as well as it should be.
Monitor the Cleaning Performance, Heater, Timer, and Control Settings
Remember a well-functioning unit should leave no grime behind, even in the trickiest nooks and crannies of the item you are cleaning. To check if your cleaner is doing its job:
- Drop in a test item (like a piece of jewelry) in the cleaning tank filled with water.
- Run a cleaning cycle—stick to the recommended time for your machine.
- Inspect the results—is it sparkling clean, or does it still look like it’s been through a grease war?
- If dirt, oil, or residue are still hanging around, your cleaner might be slacking off.
Ultrasonic cleaners aren’t just about bubbles—they bring the heat too. Well, at least the good ones do come with built-in heating elements to supercharge their cleaning power.
Even if yours lacks active heating, the cavitation process itself should generate some warmth. Here’s how to see if your cleaner is bringing the heat:
- Run a standard cleaning cycle, around 10-15 minutes should do the trick.
- Check the temp by carefully touching the tank’s exterior or measuring the cleaning solution’s warmth.
- If your cleaner stays as cold as a forgotten cup of coffee, it might be due to weak cavitation or a faulty heating element (if your model has one).
While you’re at it, don’t forget to test the timer and controls—set a duration and make sure it stops when it should. A wonky timer can throw off the whole cleaning process, leaving your items half-cleaned instead of spotless.

Employ a Cavitation Meter for Precise Measurement and Do Not Forget The Transducer
A cavitation meter is your high-tech spy gadget for uncovering whether your machine is really bubbling with power or just making noise. This nifty device measures sound waves and energy levels, giving you cold, hard data on the performance you get with your ultrasonic cleaner.
- Dip the probe into the cleaning solution while the machine is running.
- Take the readings and compare them to the manufacturer’s specs.
- If the numbers are low or all over the place, your cleaner might be slacking off.
This method is a game-changer for industrial and professional setups where precision isn’t just nice.
But that’s not all, you should also check for the working of transducers. This little powerhouse converts electrical energy into ultrasonic vibrations, so if your cleaner suddenly goes silent, a faulty transducer or loose wiring might be to blame. It’s much like the heart of your ultrasonic cleaner—without it, your machine is just a fancy tub of soapy water. To investigate the transducer:
- Unplug the machine
- Open it up (if the manufacturer allows) to peek inside
- Inspect the transducer—look for cracks, burns, or discoloration
Besides the transducers, check the wiring as loose connections can be sneaky troublemakers. Also, check the frequency readings (in kHz) using a frequency meter —they should match the values listed in your cleaner’s specs.
If something looks off, do not try to fix it yourself instead contact the manufacturer or a certified technician.
The Conclusion
Keeping your ultrasonic cleaner in top shape isn’t rocket science, but it does take a little know-how. Whether you’re crinkling foil for a quick test or getting all high-tech with a cavitation meter, each check helps ensure your machine stays at peak performance.
By sticking to a regular testing routine—especially for premium models—you’ll catch potential issues early, maintain top-notch cleaning power, and extend your equipment’s lifespan.