Most people do the finishing in seawater which includes a large number of different salts in varying concentrations. These can build up overtime becoming the main reason of jamming or clogging of the fishing reels.
Moreover, certain minerals in the seawater are highly corrosive and can get into the parts of the fishing gear as well, which causes rust and corrosion.
Freshwater even can cause damage to your fishing reels because it includes more bacteria and algae than seawater. Fish scales, sand, and silt can also cause build-up residues in the fishing reels and gear.
It is therefore very important to get your fishing equipment parts cleaned for proper functioning.
Especially after saltwater use, you need to get your fishing reel cleaned so that you can use it effectively next time while going to fishing.
How to Clean a Fishing Reel After Saltwater Use?
Here we list out a few easy DIY steps for cleaning your fishing reel after deep-sea fishing.
After checking them out we assure that you will not have difficulty cleaning your fishing equipment the next time.
Step 1. Unroll the reel
By unwinding the line completely, you can examine every section for hidden salt deposits, dirt, or grime that may have built up over time, particularly in areas that are not immediately visible.
Pay close attention to spots where the line contacts the spool, bail arm, and drag system, as these are common areas for corrosion and debris accumulation.
If the line is excessively worn or contaminated, consider replacing it to maintain optimal reel performance. But if you think it’s worth cleaning go ahead.
Step 2. Go for a dry clean
Use a bristle brush or a specialized fishing reel cleaning kit to remove any loose debris, such as dirt, algae, or salt buildup, from the reel’s surface.
Since these substances don’t adhere firmly, a gentle but thorough scrubbing should be enough to dislodge them. If necessary, use a soft, damp cloth to wipe away any remaining residue.
Step 3. Soak the brush in a salt solution
Accumulated salt is one of the most damaging substances for a fishing reel, as it can lead to corrosion and mechanical issues.
To effectively remove it, soak the bristle brush in a salt-removal solution or a mixture of warm water and mild detergent. This helps break down the salt deposits, making them easier to scrub away.
Before using the brush, allow it to drip for a few moments to prevent excess liquid from seeping into areas where moisture could cause damage, such as the reel’s internal components or drag system.
Once prepped, gently scrub all exposed parts, paying special attention to crevices where salt tends to accumulate.
Step 4. Clean the barrel
An improperly cleaned barrel can cause uneven spinning and tangled lines, affecting your overall fishing experience.
So, use a dry bristle brush to remove loose dirt, dust, and grime from the barrel’s surface. This helps dislodge outward debris without spreading moisture, which could push grime deeper into crevices.
Once you’ve completed the dry cleaning, soak the brush in a salt-away solution and go over the barrel again.
This second pass ensures that any remaining stubborn residue and salt buildup are thoroughly removed, preventing corrosion and ensuring smooth operation.
Step 5. Rinse thoroughly and oil the parts
Once you have completed the above steps, rinse the reel with fresh water and spin it back in.
Ensure that you remove even a tiny drop of water from the reel bearings after the cleaning and give a thin coating of lubricant to the device, especially if you are storing the device for a significant time before the next use.
Greasing and lubricating all the moving parts of the reel provides an extra shield to protect it better against saltwater and contamination.
So, if you do not like your reel to operate heavily, just put up a light coating of grease or oil.

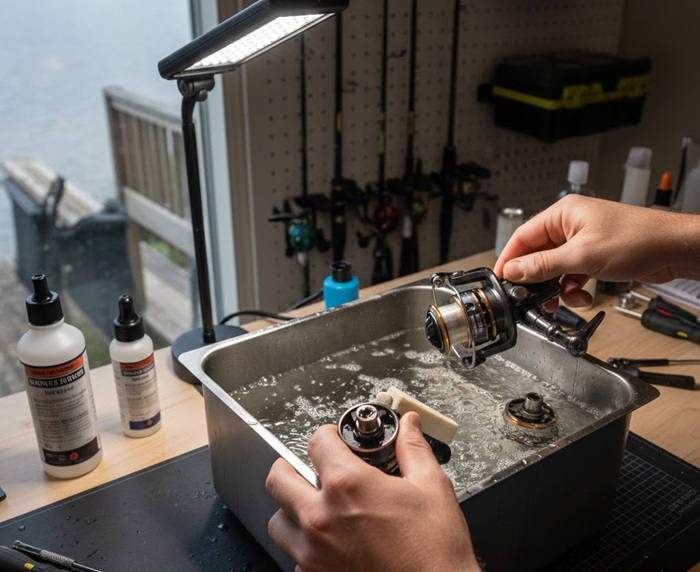
How to Use an Ultrasonic Cleaner for Fishing Reels Cleanup?
Ultrasonic cleaning devices are today widely used for cleaning heavily soiled fishing reels, equipment, and parts. Unlike abrasive methods, ultrasonically cleaning is gentle on delicate parts, preventing scratches and wear.
Additionally, it is environmentally friendly, reducing the reliance on harsh chemicals, and cost-effective, as it helps prolong the lifespan of equipment, ultimately lowering maintenance costs.
Here are the quick 5 steps to clean fishing reels using an ultrasonic cleaner:
- Disassemble the reel — Remove the spool, handle, bearings, screws, and small parts so each component gets thoroughly cleaned.
- Prepare the cleaning solution — Fill the ultrasonic cleaner with water + a mild degreasing solution suitable for metal parts.
- Load parts into the basket — Place components in the basket without stacking, ensuring they don’t touch the tank floor.
- Run the ultrasonic cycle — Set temperature around 40–50°C and run for 5–10 minutes (or longer for heavy grime).
- Rinse, dry & re-lube — Rinse cleaned parts, dry completely, and apply fresh lubrication before reassembling the reel.
The good thing about the above process is that it occurs gently and more efficiently for the spinning reels than any other cleaning process, so that it cleans salt off the fishing reel without any damage.
Their deep-cleaning ability ensures that intricate parts and hidden crevices are thoroughly cleaned, while their time efficiency allows multiple components to be cleaned quickly.
What Solution to Use for Cleaning Fishing Reels in an Ultrasonic Cleaner?
For cleaning fishing reel parts in an ultrasonic cleaner, a solution of warm water with mild dish soap like Dawn or a diluted mixture of Simple Green is a great starting point.
Simple Green, being biodegradable, effectively removes grease, grime, and oil, while some users prefer combining it with Dawn for enhanced cleaning.
As an alternative, a 50/50 white vinegar and water solution can be used after cleaning to tackle any corrosion, ensuring the reel parts remain in optimal condition.
Ultrasonic cleaner devices create microscopic bubbles that can forcefully go off in a DIY cleaning solution during a process called cavitation. This blasts grease, dirt, grime, and rust away from any hard surface.
In the process, it also helps to kill the bacteria and other pathogens that may have been deposited on the fishing gear, such as spinning reels, lures, and hooks after saltwater use.
Tips for Choosing the Right Ultrasonic Cleaner Machine for Fishing Reels
Be aware that ultrasonic cleaning devices are available in a wide range of models, sizes, powers, and prices.
So, before you choose one that is perfect for your cleaning fishing reels requirement, there are a few things to remember…
It’s good to choose a unit outfitted with a large basket that can fit your big fishing reel with all the parts, and is deep enough to fully submerge the parts.
Secondly, you need to consider the shape and size of the tank while buying one.
There are some big ultrasonic cleaning devices built with rectangular-shaped baskets, perfect for cleaning bait cast fishing reels because they keep the parts from gathering together during the cleaning process.
The cost of an ultrasonic cleaning device is also a significant element to consider. This usually depends on the power and other advanced features, such as frequency and overall quality of the device.
Besides, you also have to check the run-time of the timer. If you find it lower than 30 minutes, then the unit is not perfect for cleaning fishing reels.
There are many ultrasonic cleaners for home usage that can’t withstand long operation periods because of overheating and can break down. Choose the one equipped with timers that can be used consistently for long and are more durable than others.