
Sieves as we all know are the most effective devices used for separating elements of different sizes (fine, medium, and coarse) through the perforated or meshed surface.
Sieves differ in application, size, and shape based on what kind of particles are separated, and in what industries.
Some of the common types of sieves that are used for varied applications include:
- Air Jet Sieves
- Microplate Sieves
- Wet Washing Sieves
- Perforated Plate Sieves
Made up of either plastic or metal these are widely used in different industrial processing units, laboratory analysis as well as in kitchen and catering industries.
Analytical sieves that are being used for laboratory or scientific experiments are highly accurate tools designed for scientific excellence and procedures. Regular usage of these test sieves for different research and scientific experiments makes them vulnerable to dirt, grime, and damage very easily.
Cleaning and maintaining the test sieves from time to time is therefore crucial to get the most precise results in the lab.
How to Clean a Sieve?
Residue buildup can affect particle size analysis and lead to premature damage if not cleaned correctly. Using the right cleaning methods, however, helps preserve the sieve mesh and ensures consistent, reliable results.
Here are the guidelines and best practices for effectively cleaning your lab test sieves before and after usage.
- Always use a soft sieve cleaning brush to clean your test sieve.
- While applying very light pressure, brush the mesh or wire cloth of the sieve in circular motions.
- Now tap the sieve frame gently with the handle of the brush so that the attached particles (to the fine mesh) get dislodged.
- Next, wash the sieve using warm soapy water to remove all the near-sized particles which are already lodged in the mesh.
- You may need to brush the underside of the sieve once again. So place it in the water and then rinse the sieve with clean water.
Although the above process is good enough for regular cleaning of test sieves, ultrasonic sieve cleaning is often recommended to get even better results.
Using Ultrasonic Cleaner for Test Sieve
Sieve cleaning is a time-consuming process for lab professionals. However, if cleaned using ultrasonic sieve cleaner, you can certainly get finer results in very little time.
In fact, ultrasonic cleaning devices for sieves are highly recommended when you want to clean the lab sieve with very fine mesh.
Unlike the manual cleaning method, these devices employ a powerful strategy for gently cleaning and removing the contaminants (like emulsions, lime soaps, light greases, oils, dust, fingerprints, residues of markings and labels, etc.) bonded to the sieves’ surface without impacting its make and design.
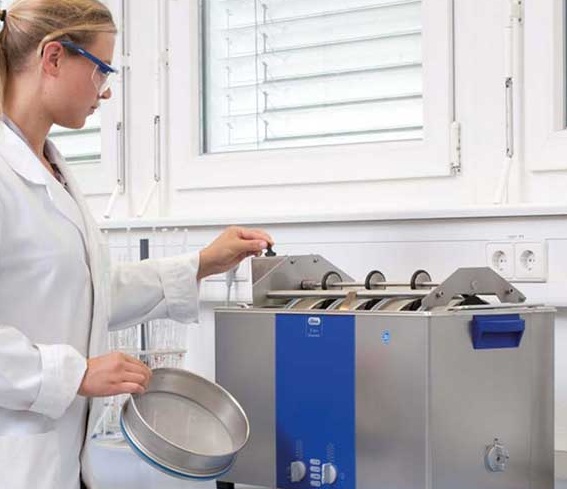
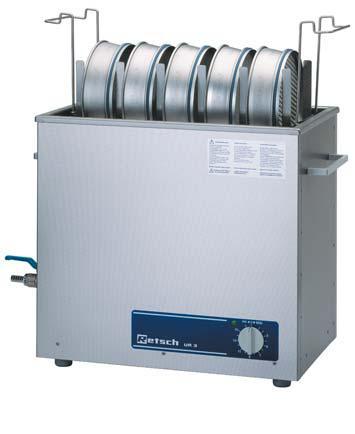
Ultrasonic sieve cleaners such as Elma Compact Ultrasonic Test Sieve Cleaner are now available in the market and have made the sieve cleaning process much easier for industries and labs.
To clean your lab test sieves in an ultrasonic cleaner, a biodegradable solution like Elma Lab Clean N10, diluted to 2% with water, is ideal. This neutral pH, foam-inhibited concentrate is specially formulated for ultrasonic cleaning and lab parts washers.
Correctly cleaning your sieves in a device like this can increase the sieving capacities many folds and can also enhance their overall longevity.
How Does an Ultrasonic Sieve Cleaner Work?
The cleaning process using an ultrasonic sieve cleaner is highly reliable and efficient. The good part is it can be repeated several times making it cost-effective for the defined laboratory applications.
- The unclean sieve is first placed in an ultrasonic bath filled with an aqueous cleaning liquid (made of water and a high-quality ultrasonic cleaning solution).
- When switched on, the cleaning device starts creating ultrasonic waves that generate microscopic bubbles.
- These bubbles collide vigorously with the soiled sieve surface placed within the cleaning liquid.
The process acts like brushing and is called cavitation, which actually removes all the sample residues from the test sieves without causing any damage to the mesh material.
The entire process involved is Eco-friendly and hence is gentler compared to the conventional sieve cleaning methods.
Precautions When Using and Cleaning the Sieves
Before conducting any testing procedures with your newly purchased test sieve, it is crucial to clean it thoroughly. This preliminary cleaning process will help eliminate potential contaminants, ensuring accurate and reliable test results.
- Start by washing the sieve with warm soapy water, using a mild detergent to break down any residual oils, grease, or manufacturing residues that may be present on the mesh or frame.
- Gently scrub with a soft brush or sponge, paying close attention to the fine mesh to avoid damage.
- Rinse thoroughly with clean water to remove any soap residue, and allow the sieve to air dry completely or pat it dry with a lint-free cloth.
After using you need to examine the finer sieves periodically so that you can detect any damaged openings.
a) Cracks in the Epoxy: Epoxy is like a frame that holds the mesh of the sieve in place. Check these edges periodically to ensure that it’s not cracked.
If there are cracks, repair or replace the sieve immediately. Not doing this can allow more particles to pass through, which can alter your testing results significantly.
b) Dents or Scratches in the Mesh: These are easy to spot by examining the sieve against a white background or backlight. If required, a magnifying glass can be used for viewing.
In case you see any spots or dents, make sure that you stop using it until repaired. If you continue to use, dents present in the sieve mesh can make the openings wider, which will again affect your analytical results.
c) Store Your Sieves Correctly: When it’s time to store always keep your testing sieves in a clean dry place. If possible, use a vertical rack that separates different sieves within different compartments. This will not only prevent any damage but also keep them well organized for easy access whenever required.
Keep in mind that storing the sieves in a wet place or at extreme temperatures can damage the mesh and epoxy, which can result in inaccurate testing.
DON’TS when Cleaning Test Sieves
Below are a few additional things that you should avoid completely while cleaning the test sieves.
- Do not use compressed air or power tools for cleaning or forcing out the embedded particles from the test sieve mesh.
- Do not use any acidic or chemically harsh solvents for cleaning as it can adversely affect the accuracy and precision of the sieve.
- Do not use the bush for cleaning sieves that are finer than 45 um (#325). Ultrasonic sieve cleaner should be used for these sieves.
The Conclusion
If you are into a business that requires you to use fine mesh sieves, do not ignore the cleaning part.
The ultrasonic sieve cleaning process effectively removes fine particles, grease, and residues that may be difficult to eliminate through manual cleaning.
By following the correct procedure—selecting the right cleaning solution, setting the appropriate time and temperature, and handling the sieves carefully—you can ensure their optimal performance and extend their lifespan while maintaining compliance with industry standards.