Let’s get one thing straight — dirty tattoo equipment isn’t just gross, it’s dangerous. We’re talking about a perfect playground for bacteria, viruses, and bloodborne pathogens that can lead to serious infections. And if you think a quick rinse is enough? Think again.
Every time a tattoo gun touches skin, especially when it draws blood and ink, it turns into a mini biohazard. That gunk builds up fast — and reusing equipment without proper cleaning and sterilization is basically rolling the dice with someone’s health. Yours and your client’s.
If you’re serious about your craft, then cleaning your tools is not optional. It’s essential. Not only does it show professionalism, but it builds trust, protects your reputation, and keeps your clients coming back — with skin that’s as safe as your artistry is bold.
So here’s the million-dollar question: can an ultrasonic cleaner get the job done?
Well, ultrasonic cleaners are fantastic at removing grime, ink, and invisible debris from tattoo equipment using high-frequency vibrations combined with a cleaning solution. They’re like mini power washers for your gear. But while they’re excellent at cleaning, they do not sterilize.
Let’s dive into why that matters — and what you should be doing instead to truly keep your tools infection-free.
How to Clean a Tattoo Equipment?
So, you’ve just wrapped up a gnarly tattoo session, and now you’re staring at your machine like it’s a crime scene. Relax, Picasso — cleaning your tattoo equipment doesn’t have to feel like defusing a bomb. But it is serious business. Dirty gear isn’t just gross — it’s dangerous.
Let’s walk through the three main ways to clean and sterilize your tattoo gear like a pro (without going full mad scientist). Spoiler alert: You might need to disassemble some stuff — but we promise, it won’t bite.
First Things First: Break It Down
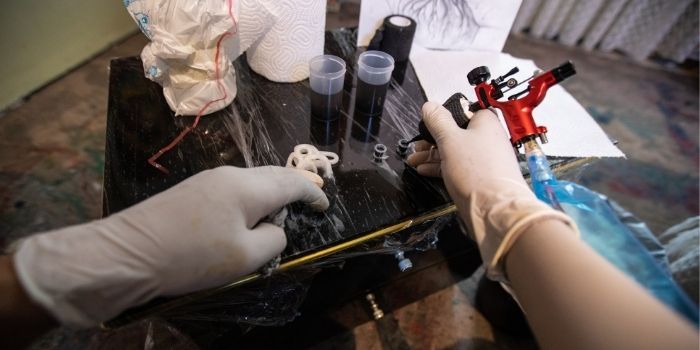
Before you even think about soap or sterilizers, you’ve got to disassemble your equipment. Yes, every little tube, tip, and needle has to come out for a proper scrub-down.
Important note: Not all machines come apart the same way. So, unless you have supernatural mechanical intuition, crack open that user manual your machine came with (you know, the one collecting dust in your drawer).
Method 1: The mighty autoclave
If you’re running a legit tattoo setup, the autoclave is your best buddy. Think of it like a pressure cooker for germs — only instead of soup, you’re nuking bacteria, viruses, and all the invisible nasties you don’t want near your client’s skin.
Here’s how to use it without feeling like you’re launching a spaceship:
- Pack it up – Place your cleaned (but not yet sterilized) parts like needles, tubes, and grips into autoclave-safe sterilization pouches.
- Tray placement – Pop those bags into the sterilization trays inside the autoclave.
- Add distilled water – Not tap, not magic potion. Just good ol’ distilled H₂O.
- Start the machine – Set it and forget it (well, for 1–2 hours).
- Cool off – Wait until the temp drops before handling anything. No one wants steamed fingers.
- Dry & assemble – Air-dry your parts, reassemble your machine, and boom — you’re ready to ink again.
Pro Tip: Autoclaves are the gold standard — but they ain’t cheap. And you’ll need to follow your local health and safety regulations to a tee. Worth it? Absolutely.
Method 2: DIY disinfecting without an autoclave
So maybe you’re tattooing at home, working on fake skin, or still saving up for your autoclave. No shame! You can still sanitize like a boss without breaking the bank.
Here’s your DIY game plan:
- Get a germ killer – Buy a high-quality disinfectant (look for hospital-grade or EPA-approved products that nuke bacteria and viruses).
- Read the instructions – Seriously, don’t wing it. Each disinfectant has its own “kill time” and usage rules.
- Soak it up – Grab a clean glass or container, pour in the germicide, and let your tattoo parts soak for 2–3 hours.
- Air dry – Carefully take the parts out, place them on a clean surface, and let them dry naturally.
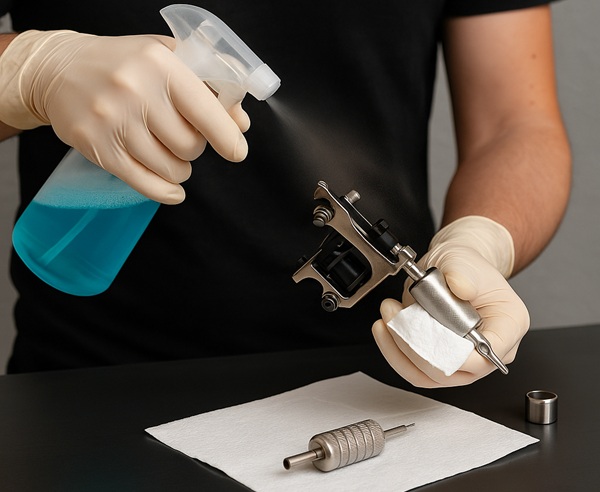
- Use a bottle sprayer – If the tattoo gun and parts are not very dirty you can also use a sprayer to clean the equipment, without the need of removing all the parts.
Safety first: Wear gloves and goggles unless you want a side gig as a superhero with chemical burns.
This method won’t give you medical-grade sterilization, but it’s way better than nothing, and it’ll help keep your gear fresh between uses.
Method 3: The ultrasonic cleaner (budget-friendly power washer)
If autoclaves are the Rolls-Royce of sterilization, then ultrasonic cleaners are your trusty street bike — affordable, efficient, and still packing a punch. They might not come with all the bells and whistles, but they’ll get your gear squeaky clean in no time.
These machines work by sending high-frequency sound waves through water, creating microscopic bubbles that blast away ink, blood, and bio-gunk from every nook and cranny.
Here’s how to use one like a pro:
- Fill the tank with 250–500 ml of water (or more, depending on your machine’s size).
- Toss in the disassembled parts — tips, tubes, grips — the whole gang.
- Set the timer for 5–10 minutes and let the magic happen.
- Remove, rinse, and air dry your freshly cleaned parts on a clean surface.
Just a word of caution: Ultrasonic cleaners clean — they don’t sterilize. That means while your tools might look spotless, they’re not necessarily pathogen-free. If you’re tattooing real humans (and not just melons or fake skin), always follow up with a proper sterilization step, like an autoclave or chemical disinfectant. Safety first, ink second!

Best Ultrasonic Cleaners for Cleaning Tattoo Equipment
We may earn a small commission if you click and shop from the links on this page.
Cleaning tattoo machines and needles with an ultrasonic cleaner device is a way to ensure that the tattoos are delivered to the customers in a safe, hygienic, and healthy manner. It is not only convenient but also an affordable must-have machine for all tattoo shop owners.
Here we list down the top ultrasonic cleaners for tattoo businesses and parlors that can be considered while buying. You can check the detailed reviews and consumer ratings before making a final buying decision.
1- iSonic CDS300 Professional Cleaner
Manufactured by a leader in ultrasonic cleaning, the iSonic Professional ultrasonic cleaner DS300 is an ideal device for sanitizing your tattoo supplies at a tattoo shop.
The 40000 Hz frequency wave technology of this compact machine breaks up all the deposited dried ink pigments on tips, tubes, and tattoo equipment parts very easily. And due to this, all you can expect is finely cleaned tattoo equipment.
Key features of the unit include:
- Two wafer transducers
- 9Qt/0. 8L tank capacity
- Touch-sensing controls & plastic basket
- Digital timer with 5 Settings, 10 minutes maximum
In addition, the device also comes with a cooling fan and a detachable power cord that makes cleaning the equipment effective and easier.
Not to mention, if you are concerned about the safety of the device, it comes with five international safety certifications that include GS for Germany – one of the toughest safety standards assuring the highest quality.
2- VEVOR Commercial Ultrasonic Cleaner
The VEVOR Commercial Ultrasonic Cleaner (6L) is a solid pick for tattoo artists who need a reliable, high-capacity machine to deep-clean their gear.
Operating at the ideal 40kHz frequency, it combines 180W ultrasonic power with 200W of heating, effectively stripping away ink, grime, and blood residues from tubes, tips, and grips — all without damaging delicate parts.
With 3 advanced transducers and a sturdy 304 stainless steel tank, it’s built to last and delivers thorough, even cleaning every time. The digital control panel makes setting time (0–30 mins) and temperature (up to 80°C) simple and precise.
Bonus: It comes with a mesh basket, so your tools stay secure during cleaning. Whether you’re a pro in the studio or a home-based artist, this cleaner is a dependable, no-fuss solution for maintaining a spotless, hygienic setup.
3- DK SONIC Touch Ultrasonic Cleaner with Heater
If you’re serious about keeping your tattoo equipment spotless, the DK SONIC Touch Ultrasonic Cleaner is a beast in the best way.
With multiple cleaning modes (Fullwave, Semiwave, Degas, and Power Sweep) based on 40kHz frequency, it tackles everything from ink buildup to blood residue with zero drama.
The touch control panel is super intuitive and even remembers your preferred settings (yes, even after unplugging). The SUS304 stainless steel tank and drain valve mean it’s built tough and resists corrosion from cleaning solutions — perfect for repeated use.
Plus, the adjustable heating up to 80°C melts away grease and gunk like magic, especially effective between 40–60°C.
Whether you’re cleaning tattoo tubes or gun grips, this machine offers pro-level results without breaking the bank. A must-have for hygiene-conscious artists.

Common Mistakes to Avoid While Cleaning Tattoo Equipment
Cleaning tattoo equipment might sound straightforward, but one wrong move can turn a clean-up into a contamination risk.
One of the most common mistakes artists make is not fully disassembling the machine before cleaning.
Needles, tubes, and grips often trap ink, blood, and tissue fluids in hidden crevices — if you don’t take them apart properly, you’re essentially cleaning around the problem, not through it.
Always refer to the manufacturer’s user manual for disassembly instructions; each machine may vary slightly, and forcing parts can damage expensive tools.
Skipping sterilization altogether and relying solely on surface cleaning.
Soap and water are great for removing visible grime, but they won’t eliminate pathogens like HIV or hepatitis.
Many beginner artists fall into the trap of thinking that a shiny tool is a clean tool — not true. Tools must be sterilized using an autoclave or an appropriate chemical disinfectant after the initial cleaning process to ensure they’re truly safe for reuse.
Equally dangerous is using the wrong cleaning agents.
Harsh chemicals like bleach or ammonia might seem like a good idea but can corrode your equipment or leave behind harmful residues that end up in your client’s skin. Always use hospital-grade, tattoo-safe germicides and clean water for rinsing.
And don’t forget to wear gloves and eye protection — protecting yourself is just as important as protecting your client.
Then there’s the legal angle.
Many artists — especially home-based or mobile ones — ignore local health regulations out of convenience or ignorance.
Most states or countries require artists to follow specific hygiene protocols, maintain sterilization logs, and use approved cleaning equipment. Failing to meet these requirements can not only shut down your setup but also result in serious liability if a client falls ill due to cross-contamination.
Ultimately, avoiding these common cleaning mistakes isn’t just about protecting your reputation; it’s about protecting lives.
Whether you’re a seasoned professional or a passionate beginner, keeping your tools spotless and safe is the foundation of responsible tattooing. A little extra care now can save you from a lot of regret — and possibly a lawsuit — later.
Final Thoughts
Tattooing is an art. But it’s also science, and hygiene is non-negotiable. Whether you’re an up-and-coming inker or a full-time pro, keeping your equipment squeaky clean shows respect for your craft and your clients.
So break down those machines, scrub like a germaphobe, and sterilize like your career depends on it — because, honestly, it does.
Now go forth and tattoo responsibly, you glorious ink wizard.