
The carburetor, as we all know, is the heart of any automotive engine. It works by blending the air and fuel for an internal combustion engine.
Made up of lightweight alloy or aluminum, carburetors are common on small as well as large engines like cars, motorcycles, lawn-mowers, rototillers, ATVs, trucks, etc, for fuel injection purposes. When working, it burns the fuel to make the vehicle go forward.
However, as an engine’s carb works all through your way while you travel, it gets clogged with dirt, gunk, grease, and oil.
Cleaning a carb once in a while is hence important so that your vehicle’s engine runs smoothly and does not create any trouble down the road.
Also in a case when your motorcycle or car engine is not in use for quite a long time, the fuel in the tank and the carburetor start to break down. In this case, you may need to replace the fuel and clean your carb before you start your engine again.
Why Use Ultrasonic Cleaner for Carburetors?
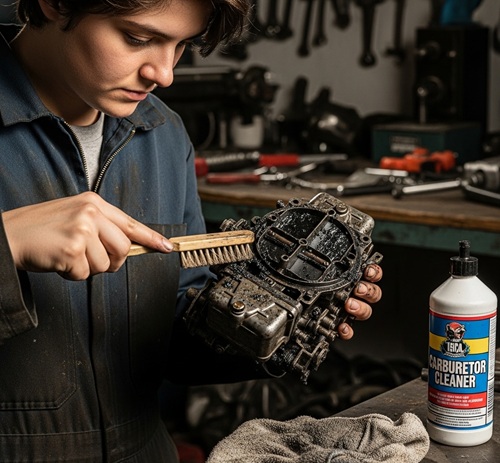
The good thing about cleaning the automotive carburetor is it’s a simple and easy process.
Most of the time, it can be simply washed by soaking the carburetor in a carb cleaning solution for a few hours. After 1-3 hours, take it out and rinse properly with plain water. Dry it off, and it’s ready for use!
Although the manual cleaning process mentioned above is easy and fast, it is not very effective if your carburetor is too dirty.
Here comes high-tech devices such as ultrasonic carburetor cleaners, which make the process easier and more efficient.
Usually, the conventional manual cleaning technique only cleans the outer surface of the object. As it doesn’t reach the crevices and corners, it doesn’t clean the residue that is being accumulated within.
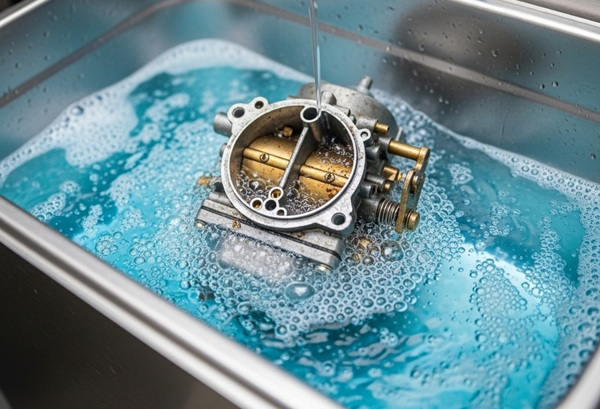
On the other hand, ultrasonic carb cleaning systems utilize high-frequency waves to efficiently remove several contaminants from the object immersed in the cleaning solvent.
The microscopic bubbles (created during the high-frequency cleaning process) then explode on the soiled surface of the carb to help remove the dirt, grime, and residue even from the most unreachable places. The results you get due to this cavitation process are amazing and beyond belief, especially concerning complex carburetors.
Not only does it reduce the overall time and money spent on cleaning a carburetor, but it also helps to deliver the best results that have never been attained with any other cleaning agents.

10 Top-Rated Best Ultrasonic Carburetor Cleaner Reviews
*At no extra cost to you, Ultrasonic-Cleaners.org may earn compensation, if you make a purchase through links on this page.As there are numerous options available in the market when it comes to ultrasonic cleaner machines for cleaning carbs, it is often difficult to find the right cleaner model (and brand) that is best suited for your particular requirement of carburetor cleaning.
We, therefore, make it easy for you by providing a brief list of 10 top-rated and best ultrasonic carburetor cleaners below.
You can check them out and choose one according to your requirement and budget after checking the detailed reviews and consumer ratings online.
1- CREWORKS Ultrasonic Equipment with Heater & Timer, 2L
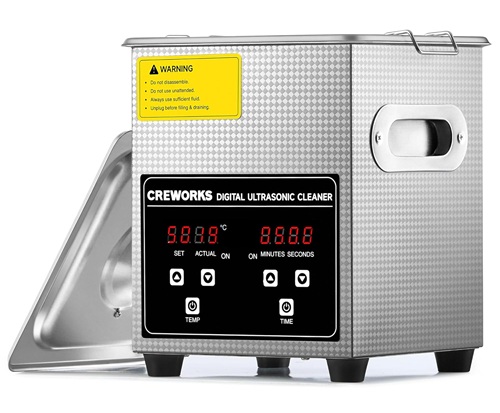
If traditional cleaning methods aren’t cutting through the stubborn gunk and grime in your carburetor, the CREWORKS Ultrasonic Cleaner offers a professional-grade solution.
- Engineered with 60W of ultrasonic power and a 100W heating element, this 2-liter stainless steel unit delivers deep, precision cleaning through advanced sonic cavitation.
- It penetrates even the most hard-to-reach areas, effortlessly dislodging built-up deposits—no scrubbing required—restoring your components to like-new condition.
- What truly distinguishes this cleaner is its industrial-grade build combined with an intuitive user interface.
- The digital control panel allows for precise adjustments of both temperature (up to 80°C) and cleaning duration (up to 30 minutes), providing complete control with minimal effort.
- For added convenience, features like a built-in drain valve and ergonomic inset handles make both operation and cleanup seamless.
Whether you’re a professional mechanic, dedicated hobbyist, or hands-on DIYer, the CREWORKS Ultrasonic Cleaner is a reliable, efficient, and essential tool for restoring carburetors and other metal parts—delivering powerful results without the mess or frustration.
2- iSonic P4820 Commercial Ultrasonic Cleaner Stainless Steel, 2.5L
iSonic has established itself as a leader in ultrasonic cleaning technology, and this 2.5-liter commercial-grade unit reflects that reputation.
Engineered for professional use in workshops, this iSonic device combines robust performance with certified safety standards to deliver reliable, efficient cleaning across a wide range of applications.
Professional features include:
- Multiple Precision Timer Settings: Select from 180, 280, 380, 480, or 90 seconds to match the cleaning cycle to your specific needs.
- Integrated Heating Element: Maintains a stable temperature of 145°F (65°C) to enhance ultrasonic action and accelerate contaminant removal.
- Active Cooling System with Auto Shut-Off: A built-in fan ensures optimal internal temperature control, while the automatic shut-off feature provides added operational safety.
- Degas Function: Maximizes cavitation efficiency by eliminating air bubbles from the cleaning solution—crucial for high-performance results.
- Stainless Steel Mesh Basket: Designed for convenience and protection, allowing safe handling of small or delicate parts during the cleaning process.
Whether you’re restoring precision components, servicing carburetors, or maintaining industrial tools, the iSonic Ultrasonic Cleaner offers a professional-grade solution that combines safety, functionality, and performance in one durable package.
3- EIWEI CD-E3 3L Dual-Frequency Ultrasonic Cleaner
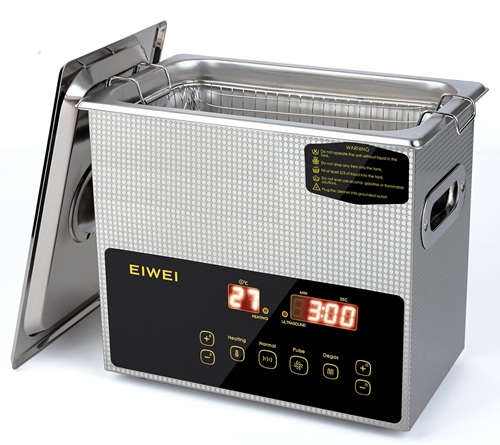
If your carburetor is choking on years of grime and buildup, the EIWEI CD-E3 3L ultrasonic cleaner is just the detox it needs.
Armed with two 60W ultrasonic transducers and dual-frequency magic (28kHz for the heavy lifting, 40kHz for the fine detailing), this machine doesn’t just clean—it revives.
Whether it’s clogged jets, gunked-up passages, or stubborn varnish, this cleaner dives deep with cavitation power that gets the job done, no scrubbing required.
The built-in degas function even clears out pesky air bubbles, so every nook and cranny gets the full sonic treatment.
Smart features like a digital timer (0–99 minutes) and an adjustable heater (up to 80°C) let you fine-tune your carburetor’s cleansing ritual. Stick with the sweet spot—50–60°C—and let the machine do the dirty work while you grab a coffee.
Housed in rugged, corrosion-resistant SUS304 stainless steel, this cleaner is more than workshop-ready—it’s built like a tank with a touch of tech.
So, whether you’re restoring a classic engine or just cleaning up your favorite weekend warrior, the EIWEI CD-E3 makes carburetor maintenance less of a chore and more of a transformation.
4- Granbo Tri-Frequency Ultrasonic Cleaning Machine
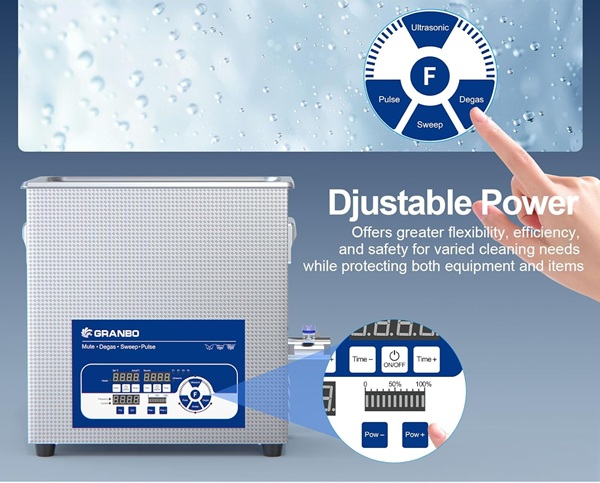
If you’ve ever tried cleaning a carburetor with a toothbrush and sheer optimism, you know the struggle.
That’s where the Granbo 6.5L Ultrasonic Cleaner strolls in—like the friend who shows up with the right tools and a smug grin because it actually works.
This machine doesn’t just clean; it deep-cleans, detail-cleans, and “I didn’t know this part could shine like this” cleans.
With tri-frequency technology, this Granbo professional ultrasonic cleaning deviceas handles everything from stubborn carbon deposits to delicate lab instruments.
And yes—your carburetors will look like they’ve been through a spa day.
A few useful features that come with the machine include:
- Tri-Frequency Cleaning (40kHz / 80kHz / 120kHz) for heavy grime, precision parts, and ultra-delicate items
- Sweep Frequency for even cavitation and thorough surface coverage
- Pulse Mode for boosted power when dealing with extra-stubborn dirt
- Degas Mode to remove trapped air and enhance cleaning efficiency
- Quiet Operation (<50dB) with durable 304 stainless steel tank
- Digital Heater & Timer (0–160 mins, up to 80°C) with 450W heating power
- Purchase Tip: Check tank size to ensure your parts fit
If you want faster workflow, cleaner carburetors, and less manual scrubbing in your life, this ultrasonic cleaner is basically the upgrade your workshop has been waiting for.
It’s powerful, smart, durable—and just quietly gets the job done.
5- Digital Pro Technologies Ultrasonic Cleaner with Dual Frequency Control, 3L

Digital Pro Technologies Ultrasonic Cleaner for carbs features a 3L tank capacity with powerful industrial transducers for enhanced cleaning results.
Furthermore, the nickel tungsten alloy heating elements in this unit provide an adjustable heating temp (125-175 Fahrenheit), and its unique dual-frequency control feature (20KHz or 40KHz) offers you amazing cleaning results all the time.
Few other distinguishing features of this USC machine include:
- Adjustable timer (5-60 Minutes)
- 200W heater and 70W ultrasonic cleaning power
- Durable stainless steel body, steel basket for parts, and lid
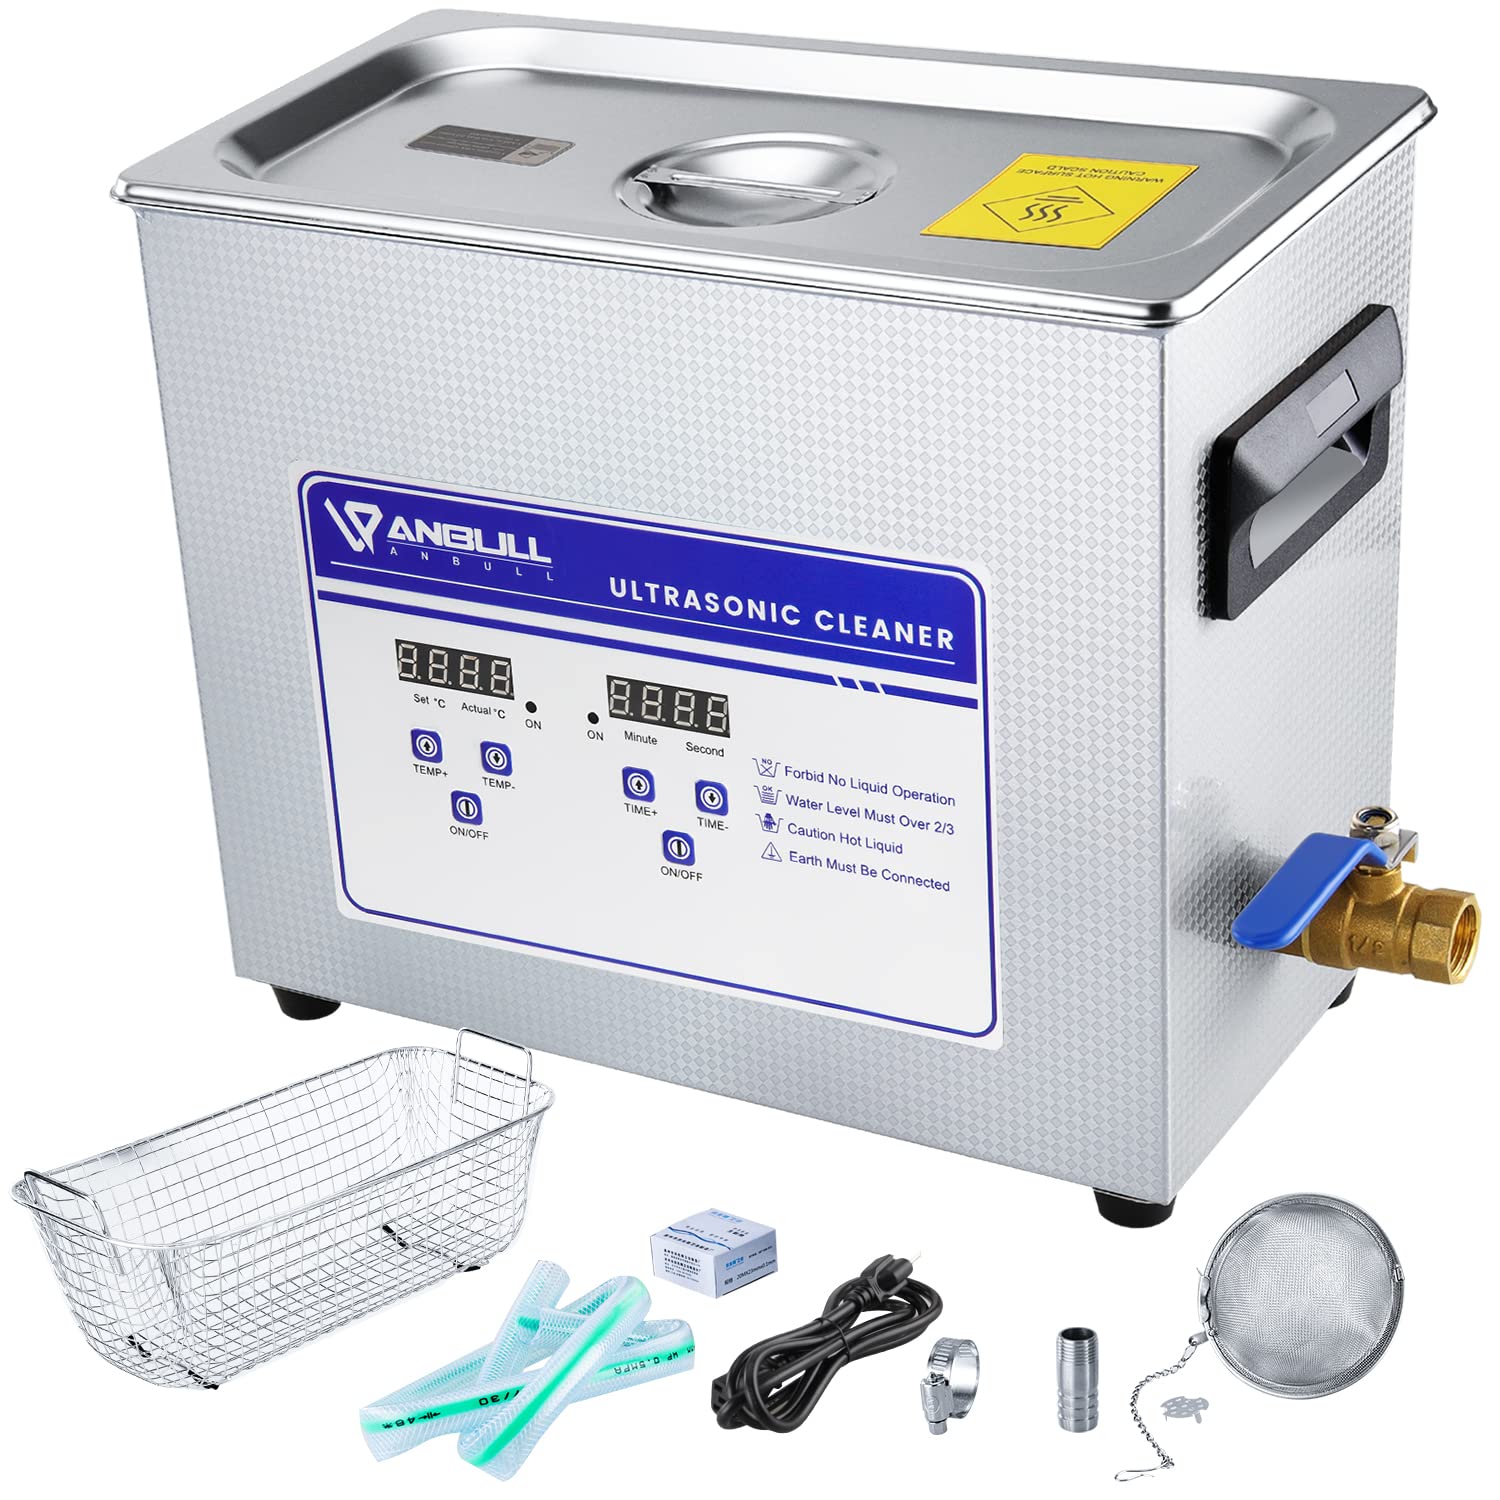
6- VEVOR Professional Ultrasonic Cleaner and Industrial Machine for Parts, 3L
VEVOR Professional Ultrasonic Cleaner is the sleek, stainless steel wizard that turns grease and grime into yesterday’s news.
With its 40 kHz ultrasonic frequency and 120W cleaning power, this 3L dynamo gets into all those tight nooks and stubborn gunk zones without scratching or damaging a thing.
Just dunk, set the timer, and let science do its thing. Your carb will come out gleaming like it’s ready for the showroom floor.
Equipped with two high-tech transducers and a digital control panel that even your grandma could use, this cleaner makes fiddling with knobs and guesswork a thing of the past.
Whether it’s varnished fuel residue or carbon crusts, it’s all gone in a fizz of bubbles and a blast of heat.
So skip the toothbrush scrubbing and embrace the future of hassle-free engine part maintenance—because your carb deserves better than a soak in petrol and a prayer.
7- KECOOLKE Sonic Cleaner with Large Capacity with Heating and Time Setting 6L
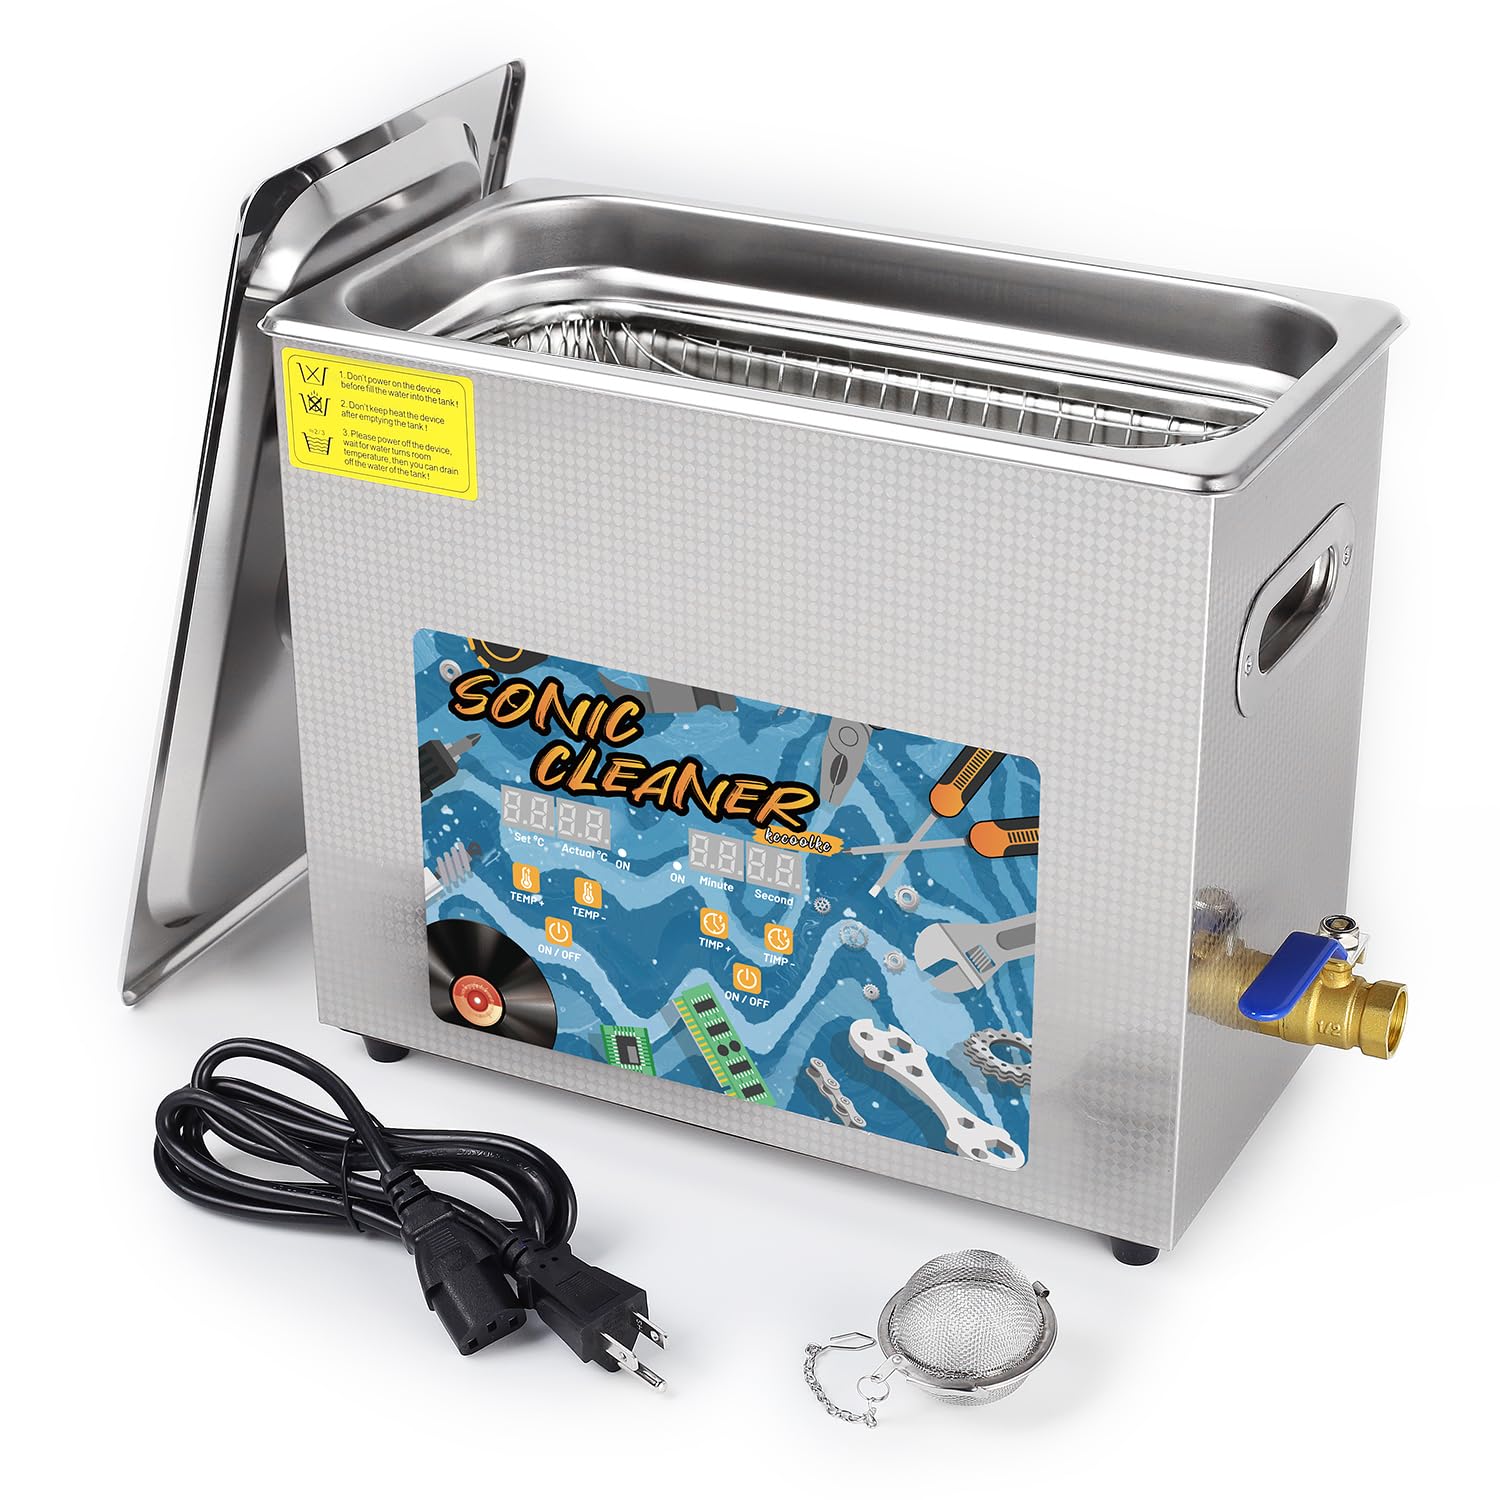
Ready to retire that toothbrush you’ve been using to scrub your carburetor? Say hello to the KECOOLKE 6L Sonic Cleaner, the high-frequency hero that blasts grime into oblivion at a whopping 42,000 vibrations per second.
That’s not just ultrasonic—that’s ultra-satisfying.
With up to 300W of heating power, this machine doesn’t just warm up—it goes full steam ahead on protein gunk, carbon crust, and all those microscopic enemies hiding in your carb’s tightest corners.
Using it is easier than brewing a cup of tea. Just add water (and maybe a dash of degreaser), toss your carb into the stainless steel tank, set your time and temp, and hit the power button.
In minutes, your parts are basking in the kind of cleanliness that even a microscope would approve of.
Durable, powerful, and surprisingly polite (thanks to its non-skid feet and dual fuses), the KECOOLKE cleaner is your ticket to professional-level engine maintenance—without the elbow grease.
8- Anbull Professional Ultrasonic Cleaner Machine with 304 Stainless Steel 6.5L
Tired of scrubbing your carburetor like it’s a medieval torture device? Meet the Anbull 6.5L Ultrasonic Cleaner—a high-capacity grime annihilator that turns your grungy engine parts into polished perfection without lifting a wrench.
With a powerful 180W ultrasonic punch and 150W of heating backup, this beast uses 3 transducers to blitz away years of gunk, fuel varnish, and carbon crust faster than you can say “fuel efficiency.”
Its large LCD display makes it feel more like a spaceship than a cleaning machine—set your temperature (68°F–176°F), pick your timer (1–30 minutes), and watch the ultrasonic waves do the dirty work.
And thanks to its 304 stainless steel tank, this 6.5L juggernaut is built to last longer than your favorite socket wrench. Whether it’s a carb, circuit board, or coin collection, if it’s dirty, the Anbull’s ready to clean it like a pro with a PhD in sparkle.
9- Granbo Ultrasonic Machine with Heater Timer and Degassing 3.2L
This 3.2L Ultrasonic Cleaning Machine is the no-nonsense, high-frequency grime assassin your garage has been begging for.
With 120W of ultrasonic muscle flexing at 40kHz and a built-in 150W heater, this cleaner doesn’t just clean, it obliterates years of fuel residue and varnish like a boss. Toss in your carb, hit the timer, and watch it bubble away the gunk while you sip coffee like a genius.
But wait—there’s more science! The degas mode kicks out trapped air from the liquid, boosting cleaning power and making sure no hidden grease blob survives.
And thanks to the sturdy 304 stainless steel tank and rock-solid transducer bonding, this machine isn’t just tough, it’s practically immortal.
Whether you’re restoring vintage engine parts or giving dentures and glasses a sparkle, this beast is all business.
10- Ultrasonic Carb Cleaner Harbor Freight for Hardware Fasteners & Metal Parts, 2.5L

This carb cleaner machine by Harbor Freight includes a 160-watt high-power transducer for enhanced cleaning of carburetors. Also, it has an easy-to-read digital timer, five preset cycles, and temperature for full control.
The Harbor Freight machine also comes with a basket and a durable, long-lasting body, which makes it easier to clean all your tools and items at the workshop.
The unit’s sturdy, long-lasting construction ensures durability in workshop environments, while the 2.5L tank provides an excellent solution for restoring carburetors, hardware fasteners, and metal components in one go.
What Size Ultrasonic Cleaner to Get for Carbs?
With the best range of ultrasonic carb cleaner machines for car and motorcycle carbs mentioned above, you can hopefully find the best one as per your requirement.
Often people make a mistake in judging the right carb size and the right cleaner they need. Hence make sure that you choose the RIGHT SIZE digital cleaner with an appropriate size cleaning tank that easily fits your carbs.
It is best to measure the overall dimension of your carburetor (including carb parts such as float bowls, slides, jets, etc.) that need to be cleaned before you order your machine online.
You can get a rough estimate of the size without removing the carb from the car engine or bike.
Then get a machine that is good enough to accommodate the whole of it.
- In most cases, a machine with a 3-liter tank is sufficient if you want to clean a small Honda motorbike carb one at a time.
- However, if you need to clean bigger carbs (like a car, lawn-mower, ATV, or other utility vehicles), it’s good to get a unit with a six or 9-liter tank.
- If you need to clean a batch of a few carbs (smaller as well as larger ones) in one round, it’s good to buy a commercial-grade machine that comes with a 20L tank
Although you can get the machine exchanged, it can be a hassle that should not be worth taking!
The key to getting the right size cleaning machine for your two-wheeler or four-wheeler carb is to order a bit bigger size machine than your measurement.
Of course, it will cost you a bit more, but it will save you from all the hassles involved in returning the machine, just in case you get the wrong size.
When choosing a cleaning machine, you may require to look at a few other factors besides the right size.
Some of these include:
- Rugged stainless steel tank
- Power and frequency of the unit
- Timer cycle, digital display, auto shut off
- Ability to heat the solution via a built-in heater
- Warranty and customer service from the manufacturer
Before picking one and using the device, do not forget to read the instructions & other details carefully.

What Parts of the Carb Can I Clean in the Machine?
Usually, all the parts included in the carb get worn out over time; practically, the more you run your vehicle (motorcycle, car, or any other), the more it gets grimed.
The parts that most often wear or deteriorate are the Carb-O-Rings, Needles, Diaphragm Rubbers, Slide Carrier, Float Valve Tips, Springs, Jets (like Main Jet, Pilot Jet, Needle Jet), and the rubber intake.
Although most of the parts in this mechanical device are moving, a few parts don’t move and deteriorate with age.
It is therefore essential that you clean the parts regularly for better upkeep and performance.
By using an automatic machine like an ultrasonic carb cleaner, you are making things pretty much easier when it comes to cleaning all the smudged carburetor parts.
You only need to place your carb in the machine and without you knowing, it can clean the outer surface as well as all the inner parts of the carb that are tough to clean manually.

When and How Often Should You Clean a Carburetor?
The answer to this question will depend on your driving style, how far you drive, the quality of fuel you use, and much more.
Most of the workshop mechanics out there recommend using a spray cleaner every month for regular carb cleaning.
While a full carburetor cleaning at a professional level (using an ultrasonic carb cleaner machine) can be done every 3-4 months.
You’re driving time and distance matter much when it comes to deep cleaning your motorcycle carbs. Because the more you drive, the more your carbs need to work to reach your destination.
And in a way to reach your destination, it’s more likely that you will fill up your vehicle’s tank with a range of fuels that come from different brands (which can be a mix of low and high quality).
For this reason, many mechanics suggest the most appropriate time for cleaning your gunked aluminum carburetor to be between 20- 30,000km.
How Do You Know If Your Carburetor Needs Cleaning?
If you are not sure whether its time to clean your carb, you should check for the following signs in your engine:
- The engine does not start or take too much time to start
- It’s running lean and causing a popping sound may be due to a bad fuel supply
- It’s running rich due to excess fuel, and less air may cause black smoke from the exhaust
- It’s flooded or overflows, causing it to flow out of bowl vents and wet spark plugs
In most cases, a carburetor is not the one that is causing the real problems. However, in many cases, when left dirty, it caused severe issues while still showing these signs.
How to Choose the Best Ultrasonic Cleaner Solution for Carburetors?
Although plain heated water with a bit of detergent can do the job for you, getting a specialized cleaning solvent that is meant mainly for cleaning the carbs can do much better.
If you want, you can also use a homemade ultrasonic cleaner solution for carburetors which can be made at home with a few easy steps.
However, care that these DIY homebrew solutions are not much effective and cannot be replaced with professional-grade cleaner solutions available on the market.
Using a high-quality ultrasonic carburetor cleaning solvent is thus recommended, which can easily knock off all the petrol and grease deposits in very little time, thus saving you time and money!
Tips for Using The Ultrasonic Carburetor Cleaner Solution Safely
When using the cleaning fluids in your ultrasonic cleaning bath, make sure that you use them properly with utmost care.
- The solvent that may rise to the bath’s surface should be skimmed off and disposed of.
- When the solution takes much longer to clean the surface or if found discolored, replace it with a fresh one.
- When replacing the old cleaning liquid, take care that you drain and dispose of the fluid according to your local regulations.
Ultrasonic carb cleaning solutions deliver a wonderful performance when used with utmost care and precautions.
Just in case you do not want to use an ultrasonic carb cleaner machine, solutions such as Simple Green, Pine-Sol, Lacquer thinner, Seafoam, and many others can also do a job alone. These solutions can also be used in automatic ultrasonic cleaning devices if you want, making the process much easier, faster, and more efficient.
How to Remove and Clean a Carburetor with Carb Cleaner? (Without Sonic Machine)
The carburetor maintains the amount of air and fuel entering the cylinders; hence, it needs to be kept in good shape for efficient bike performance.
However, if you haven’t worked on a carburetor before, then it may be slightly daunting for you.
Worry not, here is a guide to help you clean your motorcycle carburetor. Make sure you wear safety gloves and keep all the lights on.
Step 1: Remove the carburetor
Switch off the main fuel supply and drain the float chamber. Disconnect the control cable and slide after the carburetor is removed.
Now remove the float chamber. Turn the carburetor upside down and remove the screws one by one.
Step 2: Remove the floats
After you have removed the float chamber, you can see the main jets, primary jet, and overflow pipe. Make sure the floats are not leaking.
Make sure you check it after removal. Take great care in removing the pin as the aluminum stand which holds it is susceptible to damage and breaking.
Step 3: Remove and Clean Jets
A lot of bike carburetors use a two-jet system. The primary jet handles fuel flow from idle to 1/3rd throttle, and the major jet controls fuel of the remaining 2/3rd.
Sometimes the primary jet gets blocked. To fix it, you need to clean the jet or replace it.
Step 4: Air Adjusting Screw
Another thing that should be removed from the carburetor body is air. The tapered screw impacts the mixture strength and combines with the primary jet.
You can set the screw at a number of turns, and it needs to be put back to this position while reassembling.
Step 5: Cleansing
Once all the parts from the carburetor body have been removed, you should clean and evaluate them.
Every hold in the carburetor should be cleaned by using a high-quality carb cleaner spray and then blown through compressed air.
If you do not have a carb cleaner available, you can also use substitutes such as Brake Cleaner, Simple Green Pro HD Heavy-Duty Cleaner, or simply a Kerosene (or paint thinner) that’s available at your home or garage.
Make sure you also coat all the parts with WD40 well before reassembling them for better protection and functioning.
Step 6: Reassembling the carb
Now, make sure you reassemble everything in the right way. Re-attach the carburetor to the wires and keep them back in their places.
Once the carburetor is overhauled, you should fine-tune the air adjusting screw. Make sure the engine gets to normal temperature after the carburetor has been reattached.
Wrapping up
A healthy heart is a sign of good health. And the same is true for your bike engine. Except its “heart” is a “carburetor.” Like excess cholesterol in your heart can affect its functioning, the dirt and fuel residue, if it gets accumulated in a carburetor, can hinder the performance or completely block your vehicle.
Regular maintenance and cleaning will ensure that your bike runs smoothly while maintaining its top performance.
Problems with your vehicle’s carburetor are often due to its parts becoming dirty. Also, if there is excess fuel flow, the carburetor in the engine can flood, causing the vehicle to run poorly, have bad fuel economy, or become smoky when running. In any case, you need to get the carb inspected, cleaned, and fixed by a professional.
For average users and under normal conditions, the carburetor on a bike should run for roughly 50,000 km without any fuss and without needing replacement. However, if you see signs of damage soon that do not get repaired by cleaning, it’s time to replace it.